Friday, December 31, 2010

Glass Etching First Timer!

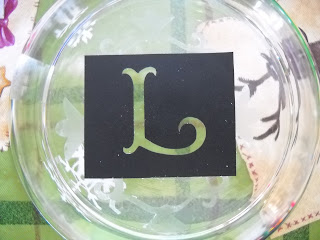
Ok, so I have to admit the etching is def. off set a little ( ok maybe a lot hehehehe! ), but I'm so happy that I figured this out on my own and just how easy it is... someone better start hiding all my glass bowls quickly!  Wishing you all a very Happy New Year and may this new year only be better than the last!  Can't wait to see you in the next year with more exciting crafts!


Happy Crafting!

Thursday, December 30, 2010

Back to the Basics Thank you design

This will be my first blog entry using my newest scraping member my Sizzix Texture Boutique!  I already love it and I only have one plate for it ( but don't worry I'm on my way to getting more hehehe! ).  I wanted to share some very simple 5 min. cards that are the same except for two small differences.  One I used my Pebbles Chalking to add color to it, and the second one I used my I - Rock ( which let me tell you it really does rock for a glitter/glam fan like me!).

Both were done in a cream color and the Thank you Stamp is from My Pink Stamper!  Have a fantastic and crafty day!
Lisa

Wednesday, December 29, 2010

A Snowy Two Page Layout from 2009

Although the snow is slowly melting with the sun out here, I wanted to post one of my more simple but snowy two page layouts that I had done recently. 


Like I said these pages were really simple: I used my corner rounder on the pictures and brackground paper.  I popped up the snowy saying with pop up dots, and I added two simple glitter snowflake stickers one on each page.  Viola!
Happy Crafting!
Lisa

Tuesday, December 28, 2010

A Happy New Year Card with my New My Pink Stamper Stamps!

Hello everyone and I hope you all had a wonderful Christmas! Mine was def. a scrapbookfilled one and I'm super excited! I can't wait to start using all of my new products to make new crafts to share with all of you! While we were at my Mom in laws house over Christmas I just couldn't wait any longer to try some of my new stuff out so I made a quick little Happy New Years Card to share with you... enjoy!

I used my new cricut font: Create a Critter, did some sanding on the blue background paper edges, and blinged it up with some stickles! The stamp at the bottom is from my very FIRST My Pink Stamper Stamp set! Woo hoo Christmas!

Thank you all and I will be trying to post many more things for all of you soon!

Happy Crafting,

Lisa

Tuesday, December 21, 2010

A Christmas Advent Calender

I actually made 4 of these advent calenders for my mom and my aunts last year, and I meant to make one for myself this year but it's been a pretty busy holiday season in our household so there is always next year : ) . But I am just so proud of them, and since I didn't have a blog last year this is a newbe for everyone on here... I hope you enjoy!


All of the advent ornaments were cut with my Cricut using the Christmas Cheer Blog ( at that time I didn't have any other winter cartridges ). I used cardboard for the christmas tree calender part and covered it with 12 x 12 scrapbook paper that I traced and cut for each specific backing. Then my loving husband helped show me how to bend nails that I poked through the cardboard with a hammer, and to hide the nailheads i used a little bling with gems that already had adhesive on them!
Merry Christmas, and I hope to upload more and more on here next year!
Lisa

Thursday, December 9, 2010

Quick & Simple Candle Renovation

Hello everyone and Happy Holidays! Here is a quick little upload on how I took 2 candles that had dents all over them and made them look a little more "Holiday Perfect"!


Fast and Easy Directions: One roll of sticky double sided tape ( P.K. Glitz ), green martha stewart glitter, and white stickles for the top parts! See told ya it was easy, now I can have the yummy smell of these candles out, while adding a little Christmas Cheer!

Happy Crafting!

Lisa

Monday, November 29, 2010

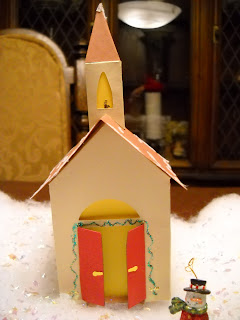
Christmas Village - Fantabulous Cricut Deck the Halls Project!
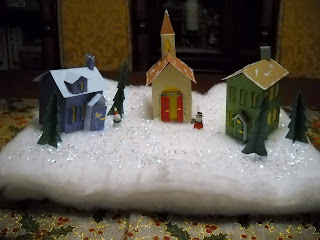
I'm so excited to finally be able to post something on here again, yay! I've been super busy crafting, but a lot of my crafts are gifts for people for the Holidays so I can't put them up until after they are opened... but I can post my winter village that I made because it's finally the Holiday season, woo hoo!!!!!!


I used my Winter Woodland cartridge to make the entire "little village" with my mother-in-law's expression machine ( thank you! Now I know why I need the big one too! hehehe). It was easy to make all of the cuts, but gluing together was a little more challenging. For the window and door decorations I used various stickles and Sharpie Markers. For the roof tops I wanted it to be more "authentic" and I used my new "snow fluff" that I found at Archiver's, so when you touch it it feels nice and soft like snow! ( plus it had glitter in it! ) As far as adhesive goes I used the scotch quick dry glue, which I also have fallen in love with. I have to say the church is my favorite, and I hope you enjoyed stopping by, I'll be sharing much more with you as this Holiday Season continue!
Happy Crafting!
Lisa


Monday, October 25, 2010

Pumpkin Seed Treats!

Every year I love making Pumpkin seeds, and this year I have to say ( not to toot my own horn ) they are the best, yummm!!! I've also been dying to make cute little goodie bags for something, so I thought why not make some bags of my pumpkin seeds for family and my hubby's work. So here's what I did:


This project was so simple and easy that it only took me 20 minutes to put together! I used the Happy Hauntings cartridge ( curtosy of Julie, thanks! ), and simply scooped the seeds into small peices of plastic wrap, tied with a black ribbon and added my little "poison" decoration with a glue dot! I love when something so simple can look so cute! Happy Haunting and Crafting!
-Lisa

Tuesday, October 19, 2010

2nd Birthday Party is a Success!

Hello happy crafters! I'm now the proud momma of a two year old! And as any crazy crafter knows you can't trust your child's birthday invitations and decorations to just anyone! ( Notice I used the word crazy in front of crafter, because I think that's what I am!) Even though it took a lot of time and effort, and a lot more time everything turned out great and was something I could be proud of! So I just thought I'd share with you our party invitation and favors! Enjoy!


All decorations were made using the Elmo Party Cartridge. Happy crafting!


Sunday, October 10, 2010

MPS Winter Challenge!


I made this a challenge times 3 for me! I wanted to really be creative and take this challenge head on... I read the message from My Pink Stamper about making sure you are creating something specifically for the challenge ( hence the challenge part ), so I wanted to do just that! And boy did I!
I saw the instructions on how to make this tri-fold split card on another blogger's site called TheCraftyKitchen, having never made one but always wanting too I followed her steps and made one yay!!! ( It was not as scary as I thought it would be )
My challenge #2 for myself was to incorporate new cartridge images that I hadn't used before... so I used Stretch Your Imagination for the Christmas Tree, and Cheerful Seasons for the Snowman.
Challenge #3 came when I wanted to use items I owned but never used ( mainly due to forgetfulness or laziness hehehe! ), and I did that too! I used my little "snowballs" and Christmas tree brads...
All in all I am quite pleased with my project, and I'm glad I really exceeded my own expectation, and hopefully inspired you to try something you want to do, but just haven't made the time for it!
Happy Crafting and Challenging too!
-Lisa

Friday, October 1, 2010

Mini Monsters MPS challenge


Hello crafters! I made these cute little displays for the MPS challenge, and I have decided to find some cute little frames to put them in for the Halloween season! ( I might even use black string to hang them down in a line and hang somewhere... hmmmmm ideas ideas!) I used the Mini Monsters cartridge, which I must say if you haven't seen it yet it is to die for ( no pun intended, hehehe!) The glitter lines on the botton were made using double sided tape from PK Glitz ( which I know you've all heard me say before I love this stuff! the glitter never comes off!), and the glitter was from Martha Stewart. This was a super easy and fun craft to put together, and thanks for stopping by!

Wednesday, September 15, 2010

Guest Blogger!

Hello! I know it has been forever, but life sure has gotten busy around here, whew! This week I wanted to put up a guest blogger... one of my best friends Julie Tatro!!!! Yay!!! She made a spectacular birthday card when she was scrapping at my house that I knew I had to share... enjoy! And big thanks to Julie for letting me share!


She used the paper doll cartridge to make her "harry potter"! She added the strips to the tie herself for more authenticity... she's just too creative, and this card is just too cute!!!


Tuesday, August 17, 2010

BIG Giveaway from The Original Scrapbox!!!

Okay everyone, if you have no clue what a scrapbox is be prepared to be wowed! This is one of the coolest storage/workspaces around for every scrapbooker and crafter to fall in love with. And the best part of all is that they are giving one away!!!!! Take a look at this:


Need to know where to sign up? Go HERE

To learn more visit these pages as well:
"Limited Edition Workbox "
"The Original Scrapbox"


Best of luck and enjoy!!!!

Wednesday, August 4, 2010

Two Different Two Page Family Layouts

I'm sorry it's been so long since I've update my page, so I'm doing a two-fer! This time I am sharing two different two page layouts that I did on my family. I start with my two page layout on my cousin's reception held at our family farm.

All of the embellishments were made using my cricut, and more specifically the images were made using the Strech Your Imagination cartridge and the lettering was done using the bold font found on the Winter Woodland cartridge. Of course you'll find my signature bling with gold and antique gold stickles.
Now my next layout is a suprise for the person in the picture, and if you are in my family shhh!!! I am hoping to suprise him with these to hang up in either one of his garages as a little suprise. I found this paper and loved it and I just knew I had to make a layout with it!


I used two new techniques for myself on these two pages. First, I finally tried writing on vellum with a fast drying black marker called Slick Writer as seen below and I loved it! I wanted to journal somewhere without covering anything up, and this was the perfect solution.


The other technique I tried was from PKGlitz. I had star brads that I really wanted to use, but they weren't in the right colors so I covered the tops of them with PKGlitz's double sided tape, folded under the stars and dipped in my choice of glitter. Below you can see a close up of the red stars, and I loved them!


Thanks for looking, and have a great day!!!!!!!!

Sunday, July 18, 2010

Peachy Keen Challenge #7!

I entered another peachy keen challenge! Yay!!! The challenge was to create a card based on our favorite holiday, and we all know mine is Christmas! Everything is so much brighter at Christmas time!

Here's how I made it: I cut the snowman out with the Snow Friends Cartridge, a snowflake ribbon that I found at JoAnn's, and there are snowflakes that don't show up too well in this picture, but look much better in person were done using the Martha Stewart glue stamp pad and glitter! In hind site I would have maybe used a black for the wording instead of the blud and I think I would put a little thought bubble underneath it so it would stand out a little more.

Sunday, July 11, 2010

Christmas In July - I just had to do it!

I absolutely love Christmas, so when it comes to scrapbooking I have quite a collection! Here's a two page layout I did of pictures dating back to 2007! ( a scrapbooker is in constant catch up mode! )


How it was made: I used background snowflake paper, and matching blue and white cardstock. The title was made using the Calligraphy Collection cartridge, and the snowflakes were made with When It's Cold Outside cartridge. The latter cartridge that I mentioned is not one easily found, it was sold mainly during the 09 Christmas time online through the Cricut website, but it offers some beautiful snowflakes as well as some 3D snowflakes you can make that I am sure I will share when it gets closer to the Holidays! And you know me, but no project is complete without the bling, so the snoflakes all got a touch of glam with stickles!

Tuesday, July 6, 2010

Peachy Keen Stamp Challenge #32

Peachy Keen Stamp Challenge #32

This is just a quick card I whipped up for a challenge set up on the Peachy Keen Stamp site... The challenge was to create a card based on a favorite vacation, so this card is based on my honeymoon trip to Jamaica! Brian and I loved to sit on a hammock that was out on the beach under a palm tree, so that's just what I made... now if only we could get back... ( The inside says... " Heck, I'd like to be there too" hehehe! )
I used my Stretch Your Imagination cartridge from Provo Craft for the trees, sea shells, and a black out watermelon shape that I transformed into a hammock. The water was just blue shimmer paper cut using a wavey blade and pop ups to make it 3D. The "beach" is a touch and feel by using wet adhesive and flocking ( it feels super soft ). The string for the Hammock is just that, string! I used my Creative Memories circle cutter to make the sun, and I added bling with some gold stickles.


Thanks for looking and feel free to tell others about my blog!!!!

Monday, July 5, 2010

Quick and Easy Storage Decorations!

I really needed something to keep some of my vertical supplies in a more organized fashion, and when I was at IKEA the other day I found a pack of magazine storage containers 5 for 2.99, and I thought I could really spruce these up...


I started out adding a little bling ( after all the world looks better through glitter covered eyes! ) by running double sided tape down one side of the organizer from PK Glitz, which is only available online through their website or at scrapbook shows. I love this product because once you add the glitter none of it comes off even if you run your hand straight over it!

The writing and crowns were done with Alphalicious ( my all time favorite cricut cartridge ). The circles were done using an 1/8 " circle punch. And I added a little glam to the crown with some stickles!

The colors I used were inspired by My Pink Stamper and her BFF Karlee Krafts, whom I absolutely love!

 
BLOGGER TEMPLATE BY DESIGNER BLOGS